UV DTF Transfer sits at the crossroads of creativity and durability, letting you embed vibrant, photo-realistic designs into textiles with a fast, heat-activated finish that holds up to wear, while giving you control over color fidelity, texture, and long-term performance. By choosing the right UV DTF transfer materials, reliable UV DTF equipment, and a smart UV DTF setup, you can reproduce consistent results from concept to finish, with predictable color and adhesion across batches. This guide helps you maximize color accuracy, minimize waste, and scale your operation across multiple orders while maintaining wash-fastness and the efficiency of DTF printing. From selecting UV-curable inks for DTF to pairing compatible films, adhesives, and protective topcoats, the right combination dictates color density, opacity on dark fabrics, and transfer durability. A tested workflow, rigorous calibration, and dependable media reduce troubleshooting and boost throughput without sacrificing quality, so your designs stay crisp from first print to last wash.
In broader terms, this method is a UV direct-to-film workflow that relies on UV-curable inks and a film-based transfer to decorate textiles with sharp details. Think of it as a digital print that moves from a specialty film to fabric via heat and pressure, producing bold color on light and dark materials. Industry discussions often describe the same process using terms like UV ink system for textiles, transfer media, or film-and-adhesive stacks that optimize opacity and durability. Practical guidance emphasizes consistent media handling, accurate curing, and repeatable setup parameters to ensure reliable results at scale.
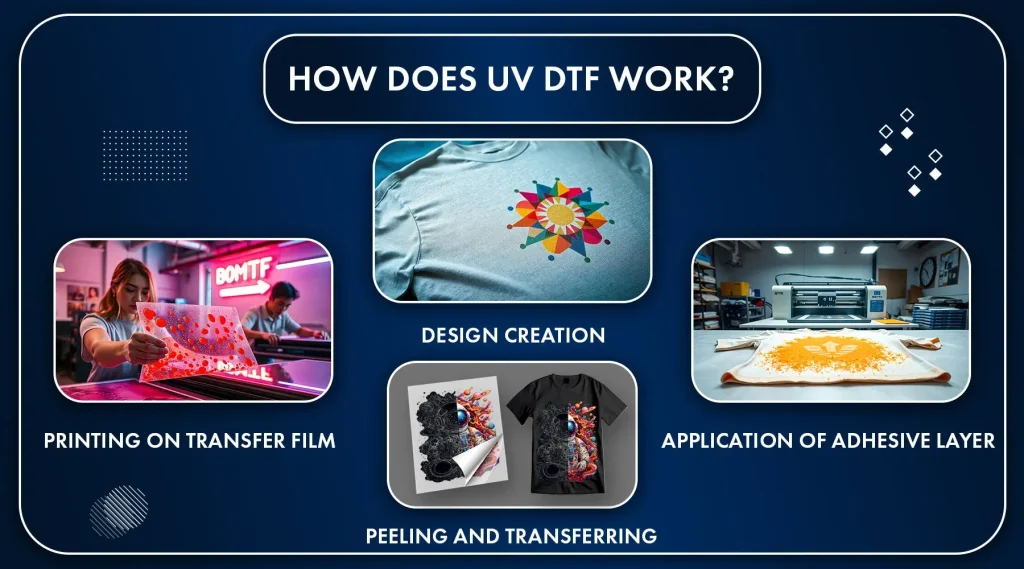
UV DTF Transfer Materials: Core Layers for Color and Durability
When you start with UV DTF transfer, the materials you choose are the foundation of color, adhesion, and wash-fastness. UV DTF transfer materials include the film, the adhesive/overlay, and the UV-curable inks and coatings that bind to fabric. The standard stack typically features a UV DTF film designed for UV-curable inks, an adhesive or release liner that ensures clean transfer, and a white ink layer for opacity on dark fabrics, followed by CMYK inks and a protective topcoat. Substrates matter too: cotton, poly blends, and synthetics each respond differently, so select fabrics you know work well with your chosen materials and validate with swatches.
To maximize performance, test combinations in small batches, measure color saturation, opacity, and wash durability, and keep a log of results. This is where DTF printing meets materials science: film thickness, translucency, and surface energy influence color brightness and ease of peeling. Pair UV-curable inks with the right coatings to resist cracking on stretch fabrics and to extend the life of designs through multiple washes.
UV DTF Equipment: Building a Reliable, Efficient System
Your UV DTF equipment determines how reliably you convert ideas into stable prints. A robust UV DTF equipment setup includes a printer designed for UV-curable inks (or a DTF printer configured for UV inks), a UV curing system that cures quickly and evenly, a heat press with precise temperature and dwell control, and a vacuum or silicone platen to maintain uniform pressure. Additionally, a capable RIP software with UV ink profiles helps reproduce accurate colors and minimize shifts between runs.
Investing in reliable components reduces downtime and rework. Regular calibration, print-head maintenance, and proper ventilation are essential. Because UV-curable inks can behave differently across films and fabrics, you want closed-loop monitoring—stable ink delivery, consistent curing, and predictable transfer performance across batches.
UV DTF Setup: Planning a Repeatable Workflow from Day One
A thoughtful UV DTF setup starts with color management, print calibration, and documented test runs. Create or apply ICC profiles tailored to your UV inks and film, and develop setup sheets that capture ideal heat press temperature, pressure, dwell time, and curing parameters for each fabric type. Having a repeatable workflow minimizes color drift and variances across orders.
Environmental controls and safety are part of setup too. Maintain steady temperature and humidity during printing and curing, ensure good ventilation for solvents, and establish safe handling practices for UV inks. A clear transfer protocol—design prep, print test strips, cure, apply adhesive, transfer, peel—reduces guesswork and speeds production while safeguarding quality.
DTF Printing with UV-curable Inks for DTF: Bright, Durable Color on Textiles
DTF printing with UV-curable inks enables vibrant designs with strong opacity on dark fabrics when used with the right UV DTF transfer materials. Your workflow benefits from a white ink layer for opacity, CMYK colorization, and a protective topcoat to improve wash durability. The selection of UV-curable inks for DTF influences color brightness, saturation, and stretch resistance, so match ink viscosity and curing to your film and fabric.
Curing is critical: improper exposure can lead to ink bleed, cracking, or poor adhesion. Use a UV curing unit with uniform exposure, and verify that the ink has fully cured before applying the adhesive or performing the transfer. This step helps preserve color fidelity and longevity after washing.
Practical Transfer Steps: Printing, Curing, and Press Parameters
From design to finished transfer, follow a repeatable sequence that aligns with your UV DTF setup. Start with a high-resolution design, add a white ink layer if opacity on dark backgrounds is required, and print on UV DTF film according to your ink profile. Validate alignment with test strips before running full sheets to minimize waste.
After printing, cure immediately and then apply the adhesive layer and transfer stack as appropriate. When transferring, use a heat press with controlled temperature, pressure, and dwell time, and ensure even contact across the entire print. Peel timing is critical—often a cold or room-temperature peel yields the best edge integrity.
Troubleshooting and Quality Assurance for Long-Term UV DTF Success
Even with good materials and equipment, issues can arise. Common UV DTF problems include color misalignment, banding, poor adhesion, and insufficient white ink opacity. Start by checking UV DTF setup: ensure ICC profiles are correct, film tension is even, and curing is uniform. A systematic approach to troubleshooting reduces guesswork and speeds recovery.
Quality assurance should be ongoing. Document each successful parameter in a production playbook, test new UV DTF transfer materials with small batches, and standardize maintenance and cleaning routines. As the market evolves with new films, inks, and coatings, revalidate your processes and keep supplier recommendations in your workflow to stay competitive.
Frequently Asked Questions
What is UV DTF Transfer and why do UV-curable inks for DTF matter for durability?
UV DTF Transfer is a direct-to-film process that uses UV-curable inks printed on a transfer film and then applied to fabric with heat. The UV-curable inks for DTF cure quickly, boosting color fastness, wash resistance, and edge stability. To maximize results, use UV DTF transfer materials designed for UV inks and follow a consistent workflow from printing to cure.
What UV DTF transfer materials are essential for quality results?
Key UV DTF transfer materials include a UV film with a smooth surface, a reliable adhesive/release liner, and UV-curable inks (including white ink for opacity on dark fabrics) plus a protective topcoat. Substrates and fabrics should be tested for adhesion and hand feel. Stock cleanable consumables and proper maintenance to reduce defects.
How do I select the right UV DTF equipment for my business?
Choose a UV DTF equipment setup that includes a UV DTF printer capable of UV-curable inks, a compatible UV curing system, and a quality heat press. Add a reliable RIP with color management and a stable platen or vacuum system for even transfer. Prioritize reliability and manageable throughput to minimize downtime.
What does a proper UV DTF setup involve and how can I optimize it?
A proper UV DTF setup involves consistent color management (ICC profiles), print calibration, substrate testing, and controlled environment conditions. Optimize transfer parameters (temperature, pressure, dwell time) for each fabric, ensure safe handling of UV inks, and maintain clean equipment for repeatable color accuracy.
What are common issues in UV DTF transfer and how can I troubleshoot them?
Common issues include color misalignment, poor adhesion, white ink opacity challenges, ghosting, and surface cracking. Troubleshooting steps: verify print head alignment and film tension, ensure proper curing, test adhesive compatibility with fabric, and adjust white ink layering or topcoat protection as needed.
What practical tips help scale a UV DTF transfer operation without sacrificing quality?
Invest in proven UV DTF transfer materials and reliable equipment, document every parameter, and batch similar jobs to improve throughput. Maintain a regular maintenance schedule, monitor ink viscosity, and stay updated on new films, inks, and coatings to support growth while preserving color accuracy.
| Area | Key Points |
|---|---|
| What is UV DTF Transfer? | A UV DTF transfer uses UV curable inks printed on a transfer film, then applied to fabric with heat and pressure. UV curing hardens inks quickly for color lock and wash durability. |
| Why it matters | It delivers sharp, flexible prints on many textiles with reduced bleeding and better longevity when using UV specific materials and equipment. |
| Core materials | Three layers matter film, adhesive release liner, and inks coatings. Film should be smooth with good release; adhesive base and topcoat affect opacity and durability. |
| Films and coatings | UV DTF film designed for UV inks with a smooth surface; adhesive layer with release liner; white UV ink for dark fabrics; protective coatings for durability. |
| Inks and coatings | Use UV-curable white ink for opacity on dark fabrics and CMYK for full color; topcoats improve wash durability and resist cracking on stretch fabrics. |
| Substrates and fabrics | Cotton, cotton blends, polyester and poly blends; substrates influence adhesion and feel; test on swatches to verify performance. |
| Accessories | Cleaning solvents lint free wipes heat resistant tapes silicone paper press sheets tacky mats and other consumables help maintain print quality. |
| Equipment | UV DTF printer or UV capable DTF printer; UV curing system; heat press; vacuum or silicone platen; RIP software and color management; clean workstation with good ventilation. |
| Setting up workflow | Color management with ICC profiles calibrate monitor and printer; run test prints; substrate tests; stable environment; safe handling of inks and solvents; define transfer parameters. |
| Practical process | From design to finish include design prep proofs printing curing adhesive setup transfer peel and post transfer care. |
| Operational tips | Maintain consistency in loading film tension and waste; keep inks well mixed; regular cleaning; test opacity on dark fabrics; consider protective topcoats. |
| Troubleshooting | Address color misalignment poor adhesion white ink opacity ghosting and surface cracking with checks on alignment tension curing and surface cleaning. |
| Pro tips | Invest in quality materials and equipment document processes scale thoughtfully stay current with new films and inks and align with client expectations. |
| Maintenance and testing | Document maintenance schedules regularly verify calibration and run sample tests before large orders. |
Summary
Conclusion
UV DTF Transfer offers a reliable path to vibrant, durable textile prints when you pair the right materials and equipment with a smart workflow. By understanding film and adhesive choices, inks and coatings, and by selecting a compatible printer, curing system, and heat press, you can achieve consistent, scalable results. Regular testing, meticulous documentation, and staying current with new materials will help your UV DTF Transfer operation grow while meeting client expectations and production deadlines.